CSS3
introduction
兼容性前缀
| prefix(前缀) | browser |
|---|---|
| -webkit | chrome/safari |
| -moz | firefox |
| -ms | IE |
| -o | opera |
1.历史
更新迭代,兼容性 ---- 加不加前缀
div {
  border-radius: ;
  -webkit-border-radius: ;
  -o-border-radius: ;
  -moz-border-radius: ;
}兼容性手册网站
2.处理器
预处理器:pre-processor
less/sass cssNext 插件
利用 sass 工具编辑(遵循人家的语法):减少人工时间
sass 演示
div {
  span {
  }
}$font-stack: arial, ...;
#mysituation-color: #444;
div {
span {
color: #mysituation-color;
}
p {
font: 100% $font-stack;
}
}
#only {
&.demo {
color: $mysituation-color;
}
}后处理器:post-processor
CSS 自动补足前缀插件(基于 caniuse 网站)autoprefixer后处理器需要在其环境内编写
优点:如果有一天,属性可以再各大浏览器应用,不需要加前缀,那么我们写的代码本身就符合规范了。可维护性好。而 sass less 不能。
3.怎么用
postCss + 插件(充分体现扩展性,200 多个)
postCss 并不能划分成什么处理器,要加上插件才能变成相应的处理器
用 js 实现 css 抽象的语法树,AST(abstract Syntax Tree),剩下的事情留给后人来做
后处理器好处:
如果浏览器都实现兼容了,用不到兼容了,就可以不用后处理器了,利于维护代码,升级。预处理器办不到。
4.CSS3 进化到编程化:cssNext
:root {
  --headline-color: #333;
}
@custom-selector: --headline h1,h2,h3,h4,h5,h6
    : --headline {
  color: var(--headline-color);
}cssNext 用来实现一些未来的标准的(未完全在各大浏览器)
border
1.border
.demo1 {
  width: 100px;
  height: 100px;
  border: 1px solid #000;
  position: absolute;
  left: calc(50% - 50px);
  top: calc(50% - 50px);
  border-radius: 50px; /*圆角:相对于宽而言的*/
}border-radius拆分
border-radius: 10px 20px 30px 40px;
/*左上-右上-右下-左下*/
border-radius: 10px 40px;
/*左上右下--右上左下*/
border-radius: 10px 20px 30px;
/*中间代表两个方向:右上左下*/继续拆分
border-top-left-radius: 10px;
border-top-right-radius: 20px;
border-bottom-right-radius: 30px;
border-bottom-left-radius: 40px;
/*等价*/
border-top-left-radius: 10px 10px;
border-top-right-radius: 20px 20px;
border-bottom-right-radius: 30px 30px;
border-bottom-left-radius: 40px 40px;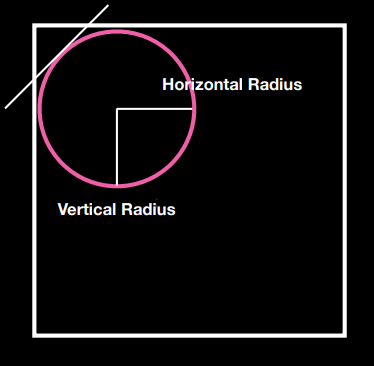
半径小于长方形的长度
1/4 圆
/*必须正方形的width=border-top-left-radius:100px 100px*/半圆
/*长方形宽大一倍*/
.demo2 {
  width: 200px;
  height: 100px;
  border: 1px solid #000;
  position: absolute;
  left: calc(50% - 50px);
  top: calc(50% - 50px);
  border-top-left-radius: 100px 100px;
  border-top-right-radius: 100px 100px;
}叶子模型
.demo {
  width: 200px;
  height: 100px;
  border: 1px solid #000;
  position: absolute;
  left: calc(50% - 50px);
  top: calc(50% - 50px);
  background-color: green;
  border-top-left-radius: 100px 100px;
  border-bottom-right-radius: 100px 100px;
}新写法
border-radius: 10px 20px 30px 40px / 10px 20px 30px 40px;2.box-shallow
外阴影&&内阴影
body{
  background-color: #000;
}
div{
  position: absolute;
  left: calc(50% - 50px);
  top: calc(50% - 50px);
  width: 100px;
  height: 100px;
  background-color: transparent;
  border: 1px solid #fff;

  不写就是外阴影
  box-shadow: 0px 0px 0px 10px #0ff;/*水平偏移量 垂直偏移量 模糊范围(基于原来边框位置向边框两边同时模糊) 传播距离(水平垂直同时增加10) 阴影颜色 */

  内阴影
  /*box-shadow: inset 1px 0px 5px 0px #fff;*/

  内外阴影
  /*box-shadow: 0px 0px 10px #fff,inset 0px 0px 10px #fff;*/


  /*四边不同颜色模糊实现*/
  box-shadow: inset 0px 0px 10px #fff,
    3px 0px 10px #f0f,
    0px -3px 10px #0ff,
    -3px 0px 10px #00f,
    0px 3px 10px #ff0;
  /*关于Z轴覆盖,哪个阴影先设置,谁就在上*/
}3 个 demo
DEMO1
body {
  background-color: #000;
}
div {
  position: absolute;
  left: calc(50% - 150px);
  top: calc(50% - 150px);
  width: 300px;
  height: 300px;
  border: 1px solid #fff;
  border-radius: 50%;
  box-shadow: inset 0px 0px 50px #fff, inset 10px 0px 80px #f0f,
    inset -10px 0px 80px #0ff, inset 10px 0px 300px #f0f,
    inset -10px 0px 300px #0ff, 0px 0px 50px #fff, -10px 0px 80px #f0f, 10px 0px
      80px #0ff;
}太阳
body {
  background-color: #000;
}
div {
  position: absolute;
  left: calc(50% - 25px);
  top: calc(50% - 25px);
  width: 50px;
  height: 50px;
  background-color: #fff;
  border-radius: 50%;
  box-shadow: 0px 0px 100px 50px #fff, 0px 0px 250px 125px #ff0;
}DEMO3
div {
  position: absolute;
  border-radius: 5px;
  left: calc(50% - 50px);
  top: calc(50% - 50px);
  width: 100px;
  height: 100px;
  background-color: #fff;
  box-shadow: 0px 1px 2px rgba(0, 0, 0, 0.1);
  transition: all 0.6s;
}
div::after {
  content: "";
  position: absolute;
  left: 0;
  top: 0;
  width: 100%;
  height: 100%;
  border-radius: 5px;
  box-shadow: 0px 5px 15px rgba(0, 0, 0, 0.3);
  opacity: 0;
  transition: all 0.6s;
}

div:hover::after {
  opacity: 1;
}

div:hover {
  transform: scale(1.25, 1.25);
}注意:背景颜色在阴影下面,文字在阴影上面
3.border-image
div {
  position: absolute;
  left: calc(50% - 50px);
  top: calc(50% - 50px);
  width: 100px;
  height: 100px;
  border: 10px solid black;
  /*支持渐变色*/
  border-color: lightpink;
  border-image-source: linear-gradient(red, yellow);
  /* 实现背景颜色渐变 */
  /* border-image-source: url(.//border.png);
    实现边框用背景图片渐变渲染
    */
  border-image-slice: 10;
}关于 slice(截取)
div {
  position: absolute;
  left: calc(50% - 50px);
  top: calc(50% - 50px);
  width: 100px;
  height: 100px;
  border: 100px solid black;
  border-color: lightpink;
  border-image-source: url(.//border.png);
  border-image-slice: 100;
  /* border-image-slice: 100 50 100 100; */
  /* 上右下左 */
  /*slice不填的话,默认100%*/
  border-image-repeat: stretch;
}几个附加值
div {
  position: absolute;
  left: calc(50% - 50px);
  top: calc(50% - 50px);
  width: 100px;
  height: 100px;
  border: 100px solid black;
  border-color: lightpink;
  border-image-source: url(.//border.png);
  border-image-slice: 100;
  /* 让背景图片往外延伸 */
  border-image-outset: 100px;
  border-image-width: 1; /* border里面能显示图片背景的宽度 */
  /* 默认为1,不同于 border-width */
  border-image-width: auto; /* 相当于slice + px  */
  /* border-image-slice: 100 100 fill; */
  /* fill填充内容区 */
  border-image-slice: 100 100;
}repeat
div {
  position: absolute;
  left: calc(50% - 50px);
  top: calc(50% - 50px);
  width: 100px;
  height: 100px;
  border: 100px solid black;
  border-color: lightpink;
  border-image-source: url(.//border.png);
  border-image-slice: 100 100 fill;
  border-image-repeat: round;
  /* stretch默认值:拉伸
    round:平铺
    repeat:平铺
    space:平铺
    */
  border-image-repeat: round stretch;
  /*也可以两个:水平垂直*/
}另一种写法:border-image:source slice repeat;
border-image: url(source/red.png) 100 repeat;background
渐变颜色生成器:linear-gradient(); radial-gradient();
div {
  position: absolute;
  left: calc(50% - 100px);
  top: calc(50% - 100px);
  width: 200px;
  height: 200px;
  /* background-image: linear-gradient(#0f0, #f00); */
  /* linear-gradient只能当成背景图片来使用,background-color不好使 */

  /*两张图片在一个容器中展示*/
  background-image: url() url(); /* 可以添加多个背景图片 */
  background-size: 100px 200px, 100px 200px;
  background-repeat: no-repeat;
  background-position: 0 0, 100px 0;
}容错机制:容错背景图片展示
1.background-origin:
图片从哪里起始 没规定在哪结束,就开始重复图片 repeat,这就是为什么看起来像是 border-box 开始的
div {
  position: absolute;
  left: calc(50% - 100px);
  top: calc(50% - 100px);
  width: 200px;
  height: 200px;
  padding: 20px;
  border: 20px solid transparent;
  background-image: url(.//source/pic1.jpeg);

  background-origin: padding-box;
  /* border-box padding-box(默认值) content-box */
  background-repeat: no-repeat;
}background-position 由 background-origin 决定的。position 相对于 origin 定位。
2.background-clip
背景图片从哪块开始截断,从哪块以外的部分都不显示背景图片,即从哪块结束
background-clip: border-box;
/* border-box(默认,废弃值) padding-box content-box text */text 精解:文字内容区反切背景图片
* {
  margin: 0;
  padding: 0;
}

div:hover {
  background-position: center center;
}

div {
  position: absolute;
  left: calc(50% - 200px);
  top: 100px;
  height: 100px;
  line-height: 100px;
  font-size: 80px;
  width: 400px;
  background-image: url(.//source/pic2.jpeg);
  -webkit-background-clip: text;
  /* 固定写法三件套,配合background-clip */
  background-clip: text;
  -webkit-text-fill-color: transparent;
  text-fill-color: transparent;
  background-position: 0 0;
  transition: all 0.6s;
}3.background-repeat
div {
  position: absolute;
  left: calc(50% - 100px);
  top: calc(50% - 100px);
  width: 200px;
  height: 200px;
  padding: 20px;
  background-image: url(.//source/pic4.jpeg);
  background-size: 50px 50px;
  /* background-repeat: no-repeat; */
  /* background-repeat: repeat-x; */
  /* background-repeat: repeat-y; */
  /* background-repeat: round;深到一定程度蹦进来一张图 */
  /* background-repeat: space;空白填充,冲到一定程度填充一张图片 */
  /* background-repeat: round space;分别是x,y */
  /* background-repeat:repeat-x相当于repeat-x no-repeat; */
}4.background-attachment
改变定位属性的
div {
  width: 500px;
  height: 700px;
  border: 1px solid red;
  /* overflow: hidden; */
  overflow: scroll;
  background-image: url(.//source/pic6.jpeg);
  background-size: 300px 300px;
  background-repeat: no-repeat;
  background-position: 100px 100px;
  /* background-attachment: local; */
  /* 相对于内容区定位 */
  /* background-attachment: scroll;默认 */
  /* 默认scroll:相对于容器定位 */
  /* background-attachment: fixed; */
  /* 相对于真正的可视区视口定位 */
}5.background-size
div {
  width: 500px;
  height: 700px;
  border: 1px solid red;
  overflow: scroll;
  background-image: url(.//source/pic6.jpeg);
  background-size: 300px 300px;
  background-repeat: no-repeat;
  background-size: cover;
  /* contain不改变宽高比,让容器包含一张完整图片,即便会出现repeat
    cover填充满容器,不改变宽高比 */
  background-attachment: scroll;
}效果
contain(可能 repeat):一条边对齐,另一条小于等于容器另一条
cover(可能超出):一条边对齐,另一条大于等于容器另一条
渐变生成器
linear-gradient
div {
  width: 200px;
  height: 100px;
  /* background-image: linear-gradient(red, white);
    background-image: linear-gradient(to right, red, green);
    background-image: linear-gradient(to left, red, green);
    background-image: linear-gradient(to bottom, red, green);
    background-image: linear-gradient(to top, red, green);
    background-image: linear-gradient(to top right, red, green); */
  /* background-image: linear-gradient(0deg, red, green);90deg 180deg */
  /* background-image: linear-gradient(90deg, red, 20px, green);颜色的终止位置 */
  /* background-image: linear-gradient(90deg, red 20px, green 60px); */
}镜像放射 radial-gradient()
div {
  width: 200px;
  height: 100px;
  /* background-image: radial-gradient(red, green, #0ff); */
  /* background-image: radial-gradient(red 20%, green 50px, #0ff 40%); */
  /* background-image: radial-gradient(circle at 100px 0px, red, green, #0ff); */
  /* background-image: radial-gradient(ellipse at 20px 30px, red, green, #0ff); */
  /* 放射半径 */
  /* closest-corner
    closest-side
    farthest-corner
    farthest-side */
  /* background-image: radial-gradient(ellipse farthest-corner at 50px 50px, red, green, #0ff); */
}颜色
HSL
HSLA
currentColor 中转颜色
div {
  width: 100px;
  height: 100px;
  border-width: 1px;
  border-style: solid;
  color: red; /*border竟然颜色改变了。一旦不设置border-color的时候,会继承color,currentColor作为中转*/
  /* css1 css2 border-color:color currentColor*/
  border-color: currentColor;
}text
1.text-shadow
x, y, blur, color
div {
  position: absolute;
  left: calc(50% - 350px);
  top: 100px;
  width: 700px;
  height: 100px;
  font-size: 80px;
  text-shadow: 3px 3px 3px #000;
  text-shadow: 3px 3px 3px #000, -10px -10px 3px #30f;
}demo
浮雕效果
body {
  background-color: #0ff;
}

div {
  position: absolute;
  left: calc(50% - 350px);
  top: 100px;
  width: 700px;
  height: 100px;
  font-size: 80px;
  color: #ddd;
  text-shadow: 1px 1px #000, -1px -1px #fff;
}镂刻效果
body {
  background-color: #0ff;
}

div {
  position: absolute;
  left: calc(50% - 350px);
  top: 100px;
  width: 700px;
  height: 100px;
  font-size: 80px;
  color: #ddd;
  text-shadow: -1px -1px #000, 1px 1px #fff;
}阴影加强
body {
  background-color: #000;
}

div {
  position: absolute;
  left: calc(50% - 350px);
  top: 100px;
  width: 700px;
  height: 100px;
  font-size: 80px;
  color: #ddd;
  text-shadow: 0px 0px 10px #0f0, 0px 0px 20px #0f0, 0px 0px 30px #0f0;
  transition: all 0.3s;
}

div:hover {
  text-shadow: 0px 0px 10px #f00, 0px 0px 20px #f10, 0px 0px 30px #f20;
}

div::before {
  content: "NO ";
  opacity: 0;
  text-shadow: 0px 0px 10px #f00, 0px 0px 20px #f10, 0px 0px 30px #f20, 0px -5px
      20px #f10, 0px -10px 20px #f20, 0px -15px 30px #f10;
  transition: all 3s;
}
div:hover::before {
  opacity: 1;
}死神来了
body {
  /* background-color: #000; */
}

div {
  position: absolute;
  left: calc(50% - 350px);
  top: 100px;
  width: 400px;
  height: 150px;
  font-size: 100px;
  font-weight: bold;
  background-repeat: no-repeat;
  background-position: -400px -50px;
  background-image: url(.//source/eye.jpeg);
  background-size: 400px 300px;
  -webkit-background-clip: text;
  background-clip: text;
  -webkit-text-fill-color: transparent;
  text-fill-color: transparent;
  transition: all 3s;
  /* text-shadow: 10px 10px 3px #000;
   		这个不能展现效果?阴影跑到了文字内容上面,因为background-clip:text,文字就变成了背景的一部分
    */
  text-shadow: 10px 10px 3px rgba(0, 0, 0, 0.1);
}

div:hover {
  background-position: 0 -50px;
}分身
body {
  background-color: #000;
}

div {
  position: absolute;
  left: calc(50% - 350px);
  top: 100px;
  width: 500px;
  height: 150px;
  font-size: 60px;
  font-weight: bold;
  color: #f10;

  text-shadow: 0px 0px 5px #f10, 0px 0px 10px #f20, 0px 0px 15px #f30;
  transition: all 1.5s;
}

div:hover {
  text-shadow: 10px -10px 10px #f00, 10px 10px 15px #ff0;
}描边效果 stroke
div {
  position: absolute;
  left: calc(50% - 350px);
  top: 100px;
  width: 500px;
  height: 150px;
  font-size: 80px;
  font-weight: bold;
  -webkit-text-stroke: 2px red;
}字体描边效果 stroke
div {
  position: absolute;
  left: calc(50% - 350px);
  top: 100px;
  width: 500px;
  height: 150px;
  font-size: 100px;
  font-weight: bold;
  color: transparent;
  font-family: simsun;
  -webkit-text-stroke: 1px red;
}font-face 字体包使用方法
@font-face {
    font-family: 'abc';字体包名字
    src: url();
}

div {
    font-family: 'abc';引入字体包
}引入折磨多图片格式的原因:
字体格式
- TureType 微软 苹果 .ttf
- opentype 微软 adobe 。opt
- woff .woff
- ie .eat
- h5 svg
MIME 协议(.ttf .txt .pdf)
如果不认识,format 让浏览器加强对字体格式的认识。format 产生映射
2. text 系列
white-space
div{
    white-space:pre;原封不动的保留你输入时的状态,空格、换行都会保留,并且当文字超出边界时不换行
    white-space:nowarp:强制所有文本在同一行内显示。
}word-break
div {
  width: 200px;
  border: 1px solid black;
  /* word-break: keep-all; */
  /* 不换行 */
  /* word-break: break-all; */
  /* 强制换行 */
  /* word-break: break-word; */
  /* 尽可能保留英文单词完整性 */
}columns 报纸布局
div {
    /* columns: column-width||column-count;; */
    /* columns: 300px 4; */
    column-count: 3;
    column-gap: 30px;
    /* 空隙 */
    column-rule: 1px solid black;
    /* 空隙分割线 */
}
p {
    margin: 10px 0;
    column-span: all;默认1
    /* 横穿整个列 */
}-webkit-column-break-before: always;
/* 前面断列,另起一列 */
-webkit-column-break-after: always;
/* 后面断列,另起一列 */column-with
/* column-count: 3;自适应 */
column-width: 300px;
/* 不太准,会自适应 */瀑布流布局 :他尽量让高的成为多数的。一个一个试试就试出来了
div {
  /*内部机制不适宜瀑布流布局 */
  column-count: 4;
  column-rule-style: solid;
}column 应用:小说阅读
<!DOCTYPE html>
<html lang="en">
  <head>
    <meta charset="UTF-8" />
    <meta name="viewport" content="width=device-width, initial-scale=1.0" />
    <title>Document</title>
    <style>
      * {
        margin: 0;
        padding: 0;
      }

      div {
        width: 300px;
        height: 500px;
        border: 1px solid red;
      }

      .content {
        column-width: 300px;
        column-gap: 20px;
        border: none;

        transition: all 2s;
      }

      div:hover .content {
        transform: translateX(-320px);
      }
    </style>
  </head>

  <body>
    <div class="wrapper">
      <div class="content">
        红星资本局从国家药监局官网获悉,1月
        14日,国家药监局发布《关于注销酚酞片和酚酞含片药品注册证书的公告(2021年
        第6号)》,公告称,根据《中华人民共和国
        药品管理法》第八十三条规定,国家药品监督管理局
        组织对酚酞片和酚酞含片进行上市后评价,评价认为酚
        酞片和酚酞含片存在严重不良反应,在我国使用风险大于
        益,决定自即日起停止酚酞片和酚酞含片在我国的生产、销
        售和使用,注销药品注册证书(药品批准文号)。
        红星资本局从国家药监局官网获悉,1月
        14日,国家药监局发布《关于注销酚酞片和酚酞含片药品注册证书的公告(2021年
        第6号)》,公告称,根据《中华人民共和国
        药品管理法》第八十三条规定,国家药品监督管理局
        组织对酚酞片和酚酞含片进行上市后评价,评价认为酚
        酞片和酚酞含片存在严重不良反应,在我国使用风险大于
        益,决定自即日起停止酚酞片和酚酞含片在我国的生产、销
        售和使用,注销药品注册证书(药品批准文号)红星资本局从国家药监局官网获悉,1月
        14日,国家药监局发布《关于注销酚酞片和酚酞含片药品注册证书的公告(2021年
        第6号)》,公告称,根据《中华人民共和国
        药品管理法》第八十三条规定,国家药品监督管理局
        组织对酚酞片和酚酞含片进行上市后评价,评价认为酚
        红星资本局从国家药监局官网获悉,1月
        14日,国家药监局发布《关于注销酚酞片和酚酞含片药品注册证书的公告(2021年
        第6号)》,公告称,根据《中华人民共和国
        药品管理法》第八十三条规定,国家药品监督管理局
        组织对酚酞片和酚酞含片进行上市后评价,评价认为酚
        酞片和酚酞含片存在严重不良反应,在我国使用风险大于
        益,决定自即日起停止酚酞片和酚酞含片在我国的生产、销
        售和使用,注销药品注册证书(药品批准文号)红星资本局从国家药监局官网获悉,1月
        14日,国家药监局发布《关于注销酚酞片和酚酞含片药品注册证书的公告(2021年
      </div>
    </div>
  </body>
</html>滑动——slide 插件
box
1.IE6 混杂模式盒子
div {
  width: 100px;
  height: 100px;
  background-color: red;
  border: 10px solid black;
  padding: 10px;
  /* 触发 */
  box-sizing: border-box;
  /*默认content-box*/
}

/*
原来:boxWidth=width+border*2+padding*2;
怪异:boxWidth=width
	 contentWidth=width - border*2 - padding*2
*/宽度不固定,内边距 padding 固定
<!DOCTYPE html>
<html lang="en">
  <head>
    <meta charset="UTF-8" />
    <meta name="viewport" content="width=device-width, initial-scale=1.0" />
    <title>Document</title>
    <style>
      * {
        padding: 0;
        margin: 0;
      }

      .wrapper {
        width: 100%;
        height: 300px;
        border: 1px solid black;
      }

      .content:first-of-type {
        float: left;
        width: 50%;
        height: 100px;
        background-color: yellow;
        padding: 0 10px;
        box-sizing: border-box;
      }

      .content {
        float: left;
        width: 50%;
        height: 100px;
        background-color: red;
      }
    </style>
  </head>

  <body>
    <div class="wrapper">
      <div class="content"></div>
      <div class="content"></div>
    </div>
  </body>
</html>输入框宽度不固定,内边距固定
<style>
    .wrapper {
        width: 300px;
        height: 300px;
        border: 1px solid black;
    }

    input {
        width: 100%;
        box-sizing: border-box;
    }

    /* input天生带2px的border,解决就用怪异盒子 */
</style>
</head>

<body>
    <div class="wrapper">
        <input type="text">
    </div>
</body>产品需求接受形式
input {
  width: 300px;
  height: 50px;
  box-sizing: border-box;
  padding: 0 10px;
}宽度用户自定,后端传的,padding border 固定
.wrapper {
  width: 300px;
  height: 300px;
  border: 1px solid red;
}

.content {
  box-sizing: border-box;
  float: left;
  width: 100px;
  height: 100px;
  border: 1px solid #fff;
  background-color: black;
}<div class="wrapper">
<div class="content"></div>
<div class="content"></div>
<div class="content"></div>
</div>两个值
1.overflow
.wrapper {
width: 300px;
height: 300px;
border: 1px solid red;
/* overflow: scroll; */
/* 除了当overflow-x,overflow-y之一设置了非 visible时,另一个属性会自动将默认值visible设置为auto */
overflow-x: scroll; /* 就会overflow-y:auto */
}移动端
明星左右滑动模块
<!DOCTYPE html>
<html lang="en">
<head>
<meta charset="UTF-8" />
<meta name="viewport" content="width=device-width, initial-scale=1.0" />
<title>Document</title>
<style>
* {
padding: 0;
margin: 0;
}
.wrapper {
width: 300px;
height: 100px;
border: 1px solid black;
overflow-x: scroll;
overflow-y: auto;
}
/* 最外层溢出部分隐藏,里面盒子=图片总体宽度 */
.box {
width: 800px;
height: 100px;
}
img {
float: left;
display: inline;
width: 100px;
}
</style>
</head>
<body>
<div class="wrapper">
<div class="box">
<img src="./1.jpg" alt="" />
<img src="./1.jpg" alt="" />
<img src="./1.jpg" alt="" />
<img src="./1.jpg" alt="" />
<img src="./1.jpg" alt="" />
<img src="./1.jpg" alt="" />
<img src="./1.jpg" alt="" />
</div>
</div>
</body>
</html>2.resize 调节元素大小 :会导致重排和重绘,性能消耗
.wrapper {
width: 300px;
height: 300px;
border: 1px solid red;
/* resize: both; */
/* resize: vertical;竖直 */
overflow: scroll;
}2.flex 弹性盒子
<!DOCTYPE html>
<html lang="en">
<head>
<meta charset="UTF-8" />
<meta name="viewport" content="width=device-width, initial-scale=1.0" />
<title>Document</title>
<style>
* {
padding: 0;
margin: 0;
}
.wrapper {
width: 300px;
height: 300px;
border: 1px solid black;
display: flex;
/* display: inline-flex; */
flex-direction: row;
/* 默认主轴水平方向,自左向右 */
flex-direction: column;
/* 垂直 */
flex-direction: row-reverse;
/* 逆反 */
flex-direction: column-reverse;
/* 垂直逆反 */
}
.content {
width: 100px;
height: 100px;
border: 1px solid green;
box-sizing: border-box;
}
</style>
</head>
<body>
<div class="wrapper">
<div class="content">1</div>
<div class="content">2</div>
<div class="content">3</div>
</div>
</body>
</html>换行实现:
flex-wrap
justify-content:基于主轴对齐方式
<!DOCTYPE html>
<html lang="en">
<head>
<meta charset="UTF-8" />
<meta name="viewport" content="width=device-width, initial-scale=1.0" />
<title>Document</title>
<style>
* {
padding: 0;
margin: 0;
}
.wrapper {
width: 600px;
height: 300px;
border: 1px solid black;
display: flex;
flex-direction: nowrap;
/* justify-content: flex-start;默认 */
/* justify-content: flex-end; 主轴向右*/
/* justify-content: center; */
/* justify-content: space-between; */
/* 两边站住,中间自适应 */
/* justify-content: space-around; */
/* 元素元素之间间距相等 */
}
.content {
width: 100px;
height: 100px;
border: 1px solid green;
box-sizing: border-box;
}
</style>
</head>
<body>
<div class="wrapper">
<div class="content">1</div>
<div class="content">2</div>
<div class="content">3</div>
</div>
</body>
</html>align-items 垂直方向
<!DOCTYPE html>
<html lang="en">
<head>
<meta charset="UTF-8" />
<meta name="viewport" content="width=device-width, initial-scale=1.0" />
<title>Document</title>
<style>
* {
padding: 0;
margin: 0;
}
.wrapper {
width: 600px;
height: 300px;
border: 1px solid black;
display: flex;
flex-direction: nowrap;
/* align-items: baseline; */
/* 基于文字对齐 */
/* align-items: stretch默认; */
/* 未设置内容区高度的话,实现拉伸;如果设置了,就不好使了 */
/* align-items: flex-start; */
/* align-items: flex-end; */
/* align-items: center; */
}
.content {
width: 100px;
/* height: 100px; */
border: 1px solid green;
box-sizing: border-box;
}
.content:first-of-type {
/* margin-top: 10px; 验证baseline*/
}
</style>
</head>
<body>
<div class="wrapper">
<div class="content">1</div>
<div class="content">2</div>
<div class="content">3</div>
</div>
</body>
</html>单行居中
<!DOCTYPE html>
<html lang="en">
<head>
<meta charset="UTF-8" />
<meta name="viewport" content="width=device-width, initial-scale=1.0" />
<title>Document</title>
<style>
* {
padding: 0;
margin: 0;
}
.wrapper {
width: 600px;
height: 300px;
border: 1px solid black;
display: flex;
flex-direction: wrap;
align-items: center; /* 主要针对单行元素来处理对齐方式的 */
align-content: center; /* 必须作用于多行元素 */
justify-content: center;
}
.content {
width: 100px;
height: 100px;
border: 1px solid green;
box-sizing: border-box;
}
</style>
</head>
<body>
<div class="wrapper">
<div class="content">1</div>
<div class="content">2</div>
<div class="content">3</div>
</div>
</body>
</html>align-content 看官方文档自学
以上都是设置在父级上的
以下是子级
order 相当于 z-index,默认 0,最好添负值;小的在前
.wrapper {
width: 600px;
height: 300px;
border: 1px solid black;
display: flex;
flex-direction: nowrap;
align-items: stretch;
flex-wrap: wrap;
}
.content {
width: 100px;
height: 100px;
border: 1px solid green;
box-sizing: border-box;
}
.content:first-of-type {
order: -2;
}
.content:nth-of-type(2) {
order: -1;
}align-self
听从自己
.wrapper {
width: 600px;
height: 300px;
border: 1px solid black;
display: flex;
flex-direction: nowrap;
align-items: center;
flex-wrap: wrap;
}
.content {
width: 100px;
height: 100px;
border: 1px solid green;
box-sizing: border-box;
}
.content:first-of-type {
align-self: flex-start;
}
.content:nth-of-type(2) {
align-self: flex-end;
}强于 align-items(父级),弱于 align-content(父级)
.wrapper {
width: 600px;
height: 300px;
border: 1px solid black;
display: flex;
flex-direction: nowrap;
align-content: center;
flex-wrap: wrap;
}
.content {
width: 100px;
height: 100px;
border: 1px solid green;
box-sizing: border-box;
}
.content:first-of-type {
align-self: flex-start;
}
.content:nth-of-type(2) {
align-self: flex-end;
}弹性盒子之弹性
flex-grow
当这一行还有剩余空间的时候,按照比例分配剩余空间,最终调整大小
<!DOCTYPE html>
<html lang="en">
<head>
<meta charset="UTF-8" />
<meta name="viewport" content="width=device-width, initial-scale=1.0" />
<title>Document</title>
<style>
* {
padding: 0;
margin: 0;
}
.wrapper {
width: 600px;
height: 300px;
border: 1px solid black;
display: flex;
}
.content {
/* */
/* flex-grow: 1; */
/* 默认0 伸展开了 */
width: 100px;
height: 100px;
border: 1px solid green;
box-sizing: border-box;
}
.content:first-of-type {
flex-grow: 1;
}
.content:nth-of-type(2) {
flex-grow: 2;
}
</style>
</head>
<body>
<div class="wrapper">
<div class="content">1</div>
<div class="content">2</div>
<div class="content">3</div>
</div>
</body>
</html>flex-shrink 默认 1
超出,不换行,启动压缩
.wrapper {
width: 600px;
height: 300px;
border: 1px solid black;
display: flex;
}
.content {
flex-shrink: 1;
width: 200px;
height: 100px;
}
/* 压缩加权算法 */
/* 200px * 1 + 200px * 1 + 400px * 3 = 1600px */
/*
200px * 1
--------- * 200px = 25px
1600
*/
.content:nth-of-type(3) {
flex-grow: 3;
width: 400px;
}深入剖析:加边框
得出最终结论:真实内容区大小*shrink + (...)=加权值
flex-basis 相当于 width 权重大于 width
默认 auto
basis 与 width 区别
.wrapper {
width: 600px;
height: 300px;
border: 1px solid black;
display: flex;
}
.content {
flex-basis: 100px;
/* 根据内容撑开 */
flex-shrink: 1;
/* width: 100px; 覆盖*/
height: 200px;
background-color: #f0f;
/*
元素撑开的话,得出以下结论:
只写basis或者basis>width,代表元素的最小宽度
设置了width并且basis小于width
basis<realWidth<width
*/
}
.content:nth-of-type(2) {
background-color: #ff0;
}
.content:nth-of-type(3) {
background-color: #0ff;
}想换行,加汉字或者设置换行
.wrapper {
width: 600px;
height: 300px;
border: 1px solid black;
display: flex;
}
.content {
height: 200px;
/* word-break: break-word;可换行,就可以参与压缩了 */
}
.content:nth-of-type(1) {
background-color: #0f0;
flex-basis: 200px;
flex-shrink: 5;
}
.content:nth-of-type(2) {
background-color: #ff0;
flex-basis: 200px;
flex-shrink: 1;
}
.content:nth-of-type(3) {
flex-basis: 400px;
background-color: #0ff;
flex-shrink: 1;
}以上,总结
当你设置宽的时候,如果 basis 设置有值,且小于 width,那么真实的宽的范围在 basis <realWidth<Width 当你不设置 width 的时候,设置 basis,元素真实的宽 min-width 当不换行内容超过内容区 会撑开容易 无论什么情况,被不换行内容撑开的容器,不会被压缩计算
探究 flex 应用 flex:0 1 auto 默认 因为设置了 flex 后会自动压缩
 基本应用
基本应用
.wrapper { width: 600px; height: 600px; border: 1px solid black; display: flex;
/*flex-wrap: wrap;*/ align-content: flex-start; } .content { background-color:
red; flex: 1 1 auto; width: 250px; height: 250px; }1.实现居中
.wrapper {
resize: both; //配合overflow使用
overflow: hidden;
width: 300px;
height: 300px;
border: 1px solid black;
display: flex;
justify-content: center;
align-items: center;
}
div.content {
width: 100px;
height: 100px;
border: 1px solid black;
}2.可动态增加的导航栏
<!DOCTYPE html>
<html lang="en">
<head>
<meta charset="UTF-8" />
<meta name="viewport" content="width=device-width, initial-scale=1.0" />
<title>Document</title>
<style>
* {
padding: 0;
margin: 0;
}
.wrapper {
width: 300px;
height: 300px;
border: 1px solid black;
display: flex;
align-items: center;
}
.item {
flex: 1 1 auto;
height: 30px;
text-align: center;
line-height: 30px;
font-size: 20px;
color: #f20;
border-radius: 5px;
}
.item:hover {
background-color: #f20;
color: #fff;
}
</style>
</head>
<body>
<div class="wrapper">
<div class="item">天猫</div>
<div class="item">淘宝</div>
<div class="item">聚划算</div>
<!-- 无论多少,都等分 -->
</div>
</body>
</html>3.等分布局(4 等分,2 等分,中间可加 margin)
实现中间固定,两边等比例自适应
<!DOCTYPE html>
<html lang="en">
<head>
<meta charset="UTF-8" />
<meta name="viewport" content="width=device-width, initial-scale=1.0" />
<title>Document</title>
<style>
* {
padding: 0;
margin: 0;
}
.wrapper {
resize: both;
overflow: hidden;
width: 400px;
height: 200px;
border: 1px solid black;
display: flex;
}
.content {
/* flex: 0 1 auto; 默认*/
flex: 1 1 auto;
/* margin: 0 10px; */
border: 1px solid green;
height: 100px;
box-sizing: border-box;
}
.content:nth-of-type(2) {
flex: 0 0 200px; /*中间固定,不能伸不能缩,即0,0,*/
}
</style>
</head>
<body>
<div class="wrapper">
  <div class="content"></div>
  <div class="content"></div>
  <div class="content"></div>
</div>
</body>
</html>实现中间固定,两边不比例自适应
加上 .content:nth-of-type(3) {
  flex: 2 2 auto;
}其中一个固定宽度的布局(固定一个,固定两个)
4.圣杯布局
<!DOCTYPE html>
<html lang="en">
  <head>
    <meta charset="UTF-8" />
    <meta name="viewport" content="width=device-width, initial-scale=1.0" />
    <title>Document</title>
    <style>
      * {
        padding: 0;
        margin: 0;
      }

      .wrapper {
        resize: both;
        overflow: hidden;
        width: 300px;
        height: 300px;
        border: 1px solid black;
        display: flex;
        flex-direction: column;
        //align-items:stretch//默认  交叉轴如果没有设置,就拉伸
      }

      .header,
      .footer,
      .left,
      .right {
        flex: 0 0 20%; /*不参与伸缩,占20%*/
        border: 1px solid black;
        box-sizing: border-box;
      }

      .contain {
        flex: 1 1 auto; //把中间内容区噔开
        display: flex;
      }

      .center {
        flex: 1 1 auto;
      }
    </style>
  </head>

  <body>
    <div class="wrapper">
      <div class="header">header</div>
      <div class="contain">
        <div class="left">left</div>
        <div class="center">center</div>
        <div class="right">right</div>
      </div>
      <div class="footer">footer</div>
    </div>
  </body>
</html>5.流式布局
模拟 float 布局
<!DOCTYPE html>
<html lang="en">
  <head>
    <meta charset="UTF-8" />
    <meta name="viewport" content="width=device-width, initial-scale=1.0" />
    <title>Document</title>
    <style>
      * {
        padding: 0;
        margin: 0;
      }

      .wrapper {
        resize: both;
        overflow: hidden;
        width: 400px;
        height: 800px;
        border: 1px solid black;
        display: flex;
        flex-wrap: wrap;
        align-content: flex-start; //模拟float
      }

      .content {
        width: 100px;
        border: 1px solid green;
        height: 100px;
        box-sizing: border-box;
      }
    </style>
  </head>

  <body>
    <div class="wrapper">
      <div class="content"></div>
      <div class="content"></div>
      <div class="content"></div>
      <div class="content"></div>
      <div class="content"></div>
      <div class="content"></div>
      <div class="content"></div>
      <div class="content"></div>
      <div class="content"></div>
      <div class="content"></div>
      <div class="content"></div>
      <div class="content"></div>
    </div>
  </body>
</html>作业:刘德华
<!DOCTYPE html>
<html lang="en">
  <head>
    <meta charset="UTF-8" />
    <meta name="viewport" content="width=device-width, initial-scale=1.0" />
    <title>Document</title>
    <style>
      * {
        padding: 0;
        margin: 0;
      }
      .wrapper {
        background-color: red;
        resize: both;
        overflow: hidden;
        display: flex;
      }
      .left {
        margin-top: 20px;
        flex: 0 0 auto;
      }
      img {
        width: 150px;
        height: 200px;
      }
      .right {
        flex: 1 1 auto;
        margin-left: 40px;
      }
      em {
        color: #fff;
        font-size: 30px;
      }
      p {
        margin-top: 20px;
        color: #fff;
        font-size: 60px;
      }
    </style>
  </head>

  <body>
    <div class="wrapper">
      <div class="left">
        <img src=".\1.jpg" alt="" />
      </div>
      <div class="right">
        <p>刘德华</p>
        <em>演员演员演员演员演员演员演员</em>
      </div>
    </div>
  </body>
</html>响应式网站开发
demo
<!DOCTYPE html>
<html lang="en">
  <head>
    <meta charset="UTF-8" />
    <meta http-equiv="X-UA-Compatible" content="IE=edge" />
    <meta name="viewport" content="width=device-width, initial-scale=1.0" />
    <title>Document</title>
    <style>
      * {
        padding: 0;
        margin: 0;
      }

      div {
        font-size: 14px;
      }

      .wrapper {
        width: 1500px;
        font-size: 0;
      }

      .content {
        width: 300px;
        height: 200px;
        border: 1px solid black;
        display: inline-block; //不用浮动,而是用这种方法
        box-sizing: border-box;
        /*
                换行?
                1.凡是带有inline-block都有文字特性,制表符=文字大小
                2.border
                */
      }
    </style>
  </head>

  <body>
    <div class="wrapper">
      <div class="content"></div>
      <div class="content"></div>
      <div class="content"></div>
      <div class="content"></div>
      <div class="content"></div>
    </div>
  </body>
</html>2.响应式网页设计
真正的响应式设计方法不仅仅是根据可视区域大小而改变网页布局,而是要从整体上颠覆当前网页的设计方法,是针对任意设备的网页内容进行完美布局的一种显示机制。
用一套代码解决几乎所有设备的页面展示问题
设计工作由产品经理或者美工来出
详解 meta:将页面大小 根据分辨率不同进行相应的调节 以展示给用户的大小感觉上差不多
1css 像素 != 设备像素 (根据屏幕分辨率 相应的调整)
<meta
  name="viewport"
  content="width=device-width, initial-scale=1.0, user-scalable=no"
/>
<meta http-equiv="X-UA-Compatible" content="ie=edge" />3.设置视口
模拟移动端的 meta
<meta
  name="viewport"
  content="width=device-width,minimum-scale=1.0,maximum-scale=1.0,user-scalable=no"
/>width: 可视区宽度
device-width: 设备宽度
minimum-scale: 最小缩放比
maximum-scale: 最大缩放比
width = device-width : iphone 或者 ipad 上横竖屏的宽度 = 竖屏时候的宽度 不能自适应的问题
initial-scale=1.0 : windows phone ie 浏览器 上横竖屏的宽度 = 竖屏时候的宽度 不能自适应的问题
user-scalable: 是否允许用户缩放
Css 像素根据设备像素进行计算 1css 像素 == 1 是设备像素 根据设备的分辨率 dpi 值来计算 css 像素真正展现的大小
meta 功能即适配各种不同分辨率的设备
4.响应式网页开发方法
- 流体网格:可伸缩的网格 (大小宽高 都是可伸缩(可用 flex 或者百分比来控制大小)float)---》 布局上面 元素大小不固定可伸缩
- 弹性图片:图片宽高不固定(可设置 min-width: 100%)
- 媒体查询:让网页在不同的终端上面展示效果相同(用户体验相同 à 让用户用着更爽) 在不同的设备(大小不同 分辨率不同)上面均展示合适的页面
- 主要断点: 设备宽度的临界点 大小的区别 ---》 宽度不同 ---》 根据不同宽度展示不同的样式 响应式网页开发主要是在 css 样式(异步加载)上面进行操作
5.媒体查询
媒体查询是向不同设备提供不同样式的一种方式,它为每种类型的用户提供了最佳的体验。
css2: media type
media type(媒体类型)是 css 2 中的一个非常有用的属性,通过 media type 我们可以对不同的设备指定特定的样式,从而实现更丰富的界面。
css3: media query
media query 是 CSS3 对 media type 的增强,事实上我们可以将 media query 看成是 media type+css 属性(媒体特性 Media features)判断。
如何使用媒体查询?
媒体查询的引用方法有很多种:
- link 标签
- @import url(example.css) screen and (width:800px);
- css3 新增的@media
媒体查询不占用权重
使用方法
媒体类型(Media Type): all(全部)、screen(屏幕)、print(页面打印或打印预览模式)
媒体特性(Media features): width(渲染区宽度)、device-width(设备宽度)...
Media Query 是 CSS3 对 Media Type 的增强版,其实可以将 Media Query 看成 Media Type(判断条件)+CSS(符合条件的样式规则)
6.媒体类型
媒体特性(media features) 逻辑操作符 合并多个媒体属性 and
@media screen and (min-width: 600px) and (max-width: 100px);合并多个媒体属性或合并媒体属性与媒体类型, 一个基本的媒体查询,即一个媒体属性与默认指定的 screen 媒体类型。 指定备用功能
@media screen and (min-width: 769px), print and (min-width: 6in)“没有 or 关键词可用于指定备用的媒体功能。相反,可以将备用功能以逗号分割列表的形式列出 这会将样式应用到宽度超过 769 像素的屏幕或使用至少 6 英寸宽的纸张的打印设备。 指定否定条件
@media not screen and (monochrome);要指定否定条件,可以在媒体声明中添加关键字 not,不能在单个条件前使用 not。该关键字必须位于声明的开头,而且它会否定整个声明。所以,上面的示例会应用于除单色屏幕外的所有设备。 向早期浏览器隐藏媒体查询
media="only screen and (min-width: 401px) and (max-width: 600px)"媒体查询规范还提供了关键字 only,它用于向早期浏览器隐藏媒体查询。类似于 not,该关键字必须位于声明的开头。Only 指定某种特定的媒体类型 为了兼容不支持媒体查询的浏览器 早期浏览器应该将以下语句 media="screen and (min-width: 401px) and (max-width: 600px)" 解释为 media="screen": 换句话说,它应该将样式规则应用于所有屏幕设备,即使它不知道媒体查询的含义。 无法识别媒体查询的浏览器要求获得逗号分割的媒体类型列表,规范要求,它们应该在第一个不是连字符的非数字字母字符之前截断每个值。所以,早期浏览器应该将上面的示例解释为:media="only" 因为没有 only 这样的媒体类型,所以样式表被忽略。 Query -à css3
易混淆的宽度
device-width/height width/height来做为的判定值。device-width/device-height 是设备的宽度(如电脑手机的宽度 不是浏览器的宽度) width/height 使用 documentElement.clientWidth/Height 即 viewport 的值。渲染宽度/高度 视口宽度/
7.单位值
Rem:rem 是 CSS3 新增的一个相对单位(root em,根 em)相对的只是 HTML 根元素。
Em:em 是相对长度单位。相对于当前对象内文本的字体尺寸。如当前对行内文本的字体尺寸未被人为设置,则相对于浏览器的默认字体尺寸。
Px: px 像素(Pixel)。相对长度单位。像素 px 是相对于显示器屏幕分辨率而言的。
Vw:相对于视口的宽度。视口被均分为 100 单位的 vw
Vh:相对于视口的高度。视口被均分为 100 单位的 vh
Vmax: 相对于视口的宽度或高度中较大的那个。其中最大的那个被均分为 100 单位的 vmax
Vmin:相对于视口的宽度或高度中较小的那个。其中最小的那个被均分为 100 单位的 vmin
rem 相对于html元素的font-size大小 em 相对于本身的font-size大小
font-size属性是可以继承的 vw/ vh 相对于视口而言的 会把视口分成100份 vmax
区视口宽高中最大的一边分成100份 vmin 区视口宽高中最小的一边分成100份 css样式引入
媒体查询不占用权重